Hi
everyone! Welcome to my 200th blog post. As with each milestone
post, I decided to write about something special in this one too. My 100th
blog post was about the Liebster award & the 150th one was about
My First Lipstick Purchase.
Today
I’m going to talk about a topic that is very close to my heart- under eye
makeup - and because of this reason, a lot of planning went to this post. In the
meantime, color-correctors have been pushed on to everyone as a “trend”. To me,
that’s the strangest & most ridiculous thing ever.
Color correction is not a trend. If you do not need it, why will you waste your time & money on it?
COLOR CORRECTORS
Color-correctors help to mask skin discoloration by bringing problem areas to a more neutral hue.
Firstly,
determine If You NEED to color correct
your under eye area. How do you determine that? Its simple: For years I’ve seen YouTubers teaching us to
conceal our under eye area with a lighter color concealer. This way, you are
concealing & brightening your under eye area. Do you know what happens when
a person when really dark circles tries that? If you suffer from the same
problem, you will know. Our under eye area appears grayish! We actually end up
looking like we don’t have a clue about makeup!
If you
have been able to conclude that you do need to correct your under eye, let’s understand what is the best color
that will help you. For that, you need to take a look at the color wheel. Complementary
colors are colors that are completely opposite each other on the color wheel.
The following are the pairs of basic complementary colors you'll use for color
correcting: red with green, yellow with purple, and blue with orange. For most
types of color correcting, makeup of one
color will cancel out discoloration of its complement. (source)
Now
being completely honest, till date I cannot understand if my dark circles are
bluish or purple-ish. If you face the same conundrum, I have some hacks for you:
#1 Most under eye circles are
concealed by light peach / peach / orange / dark orange correctors,
depending on your skin tone.
#2 If you fall in the fair
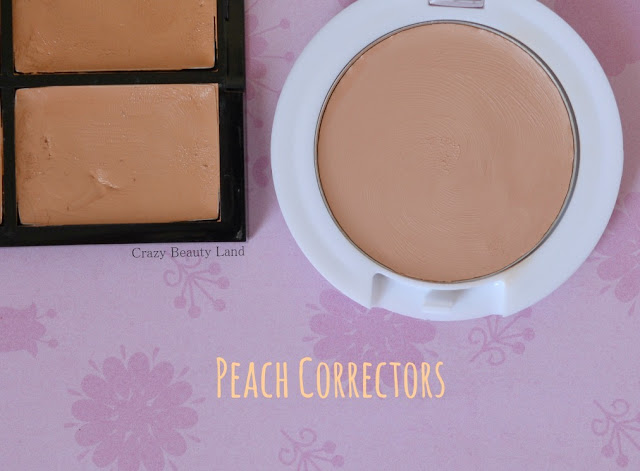
category, go for light peach to peach correctors. Peach correctors are mostly used by those whose skin have cool
undertones. {featured below is the peach from Freedom Pro Conceal palette & MUA Pro Base Peach Corrector}
#3 Peach correctors are too light
for medium to deeper skin tones so look out for various shades of orange
correctors. Orange color correctors are
mostly used by those whose skin have warm undertones. Here are a few
different orange color corrector shades:
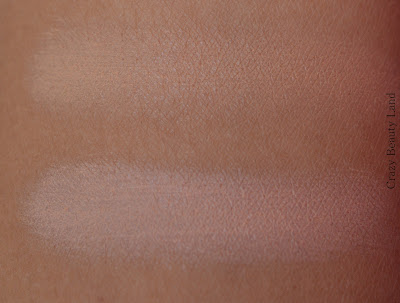
Here’s a comparison
between peach & orange correctors. You can see that the peach shades
are too light to perform any corrective action on my skin
#4 Your best bet is to go in store and see what fits you.
However, if that is not possible, investing
in a color-correcting palette is the next best thing. Right now I have the Freedom Pro Conceal palette
with me.
#5 The best way to understand
what corrector you should probably not use for under eye is this: pastel color correctors/concealers mostly
suit cool skintones
CONCEALERS
The ultimate hack is to find a concealer/corrector that can
act as a corrector+concealer on your dark circles, so that
you do not have to worry about layering up products. I have yet to find such a
product. So I use the following concealer i.e DFD from Kryolan Derma Color
range or this middle shade from the Freedom Pro Conceal palette.
A concealer should match your skin tone.
HIGHLIGHTERS
Highlighters are completely optional products. If you’re a beginner here, then there’s no need
to worry about highlighting. I decided to include it here because it didn’t
make sense to have a separate post for just this one step. Also, I’ve recently started wearing specs daily
and highlighting really makes a difference to my look.
There are mainly two types of highlighters that are suitable for under eye highlighting
– pink toned & yellow toned. You don’t need to buy a separate highlighter;
you can also use a lighter shade of
concealer for highlighting. Below I have two highlighters, one is a yellow one from the Freedom Pro Conceal palette and the other is the beige toned Maybelline Dream Lumi Touch Highlighting concealer in the shade Honey. Honey is relatively
a pinkish beige toned highlighter, for my skin.
Pink toned highlighters mostly suit cool toned complexions and yellow highlighters suit warm toned complexions.
It may take a while to find the right the shade
for you, even then, you can try
correcting and concealing with the tutorial below.
What
you’ll need:
1. a
primer. I used the Colorbar Perfect Match primer
2. a squishy makeup sponge. Even those triangle
makeup sponges will do. I’m using the Beauty Blender sponge.
3. Synthetic eye makeup brushes – I’m using the
Colorbar Emphaseyes eye blending brush & Pro Arte 217 brush (similar to
Zoeva 227 brush)
4. {duh} Corrector*, concealer* &
highlighter (optional). I’m using my trusty Kryolan Derma Color Camouflage Cremes for corrector & concealer and the yellow shade from Freedom Pro
Conceal palette as a highlighter.
5. Loose powder. I’m using the Kryolan Translucent Loose Powder in TL04 (yellow color)
*unless you have a shade that can perform the
job of concealing+correcting
Step By Step Tutorial For Color Correcting, Concealing & Highlighting Dark Circles
Step 1: prep your under eye area by first applying eye cream & then a primer. I don’t do use a primer every
time, but for the first few times as a beginner, using a primer to smoothen out the
eye area is very helpful for getting flawless results !
Step 2: I take some of the orange corrector onto
the Pro Arte 217 brush. The shade is D30.
Step 3: gently apply the corrector in the under
eye area using swiping motions. I’m using a brush here because I like to get
into every nook of my under eye area, including the inner corner and tear duct area.
Step 4: if you’re using a sponge like the beauty
blender, its time to get it damp & ready for use.
Step 5: use the sponge to pat the product onto
your skin. Next actions are important because you don’t want the corrector to
fade away. What I like to do is repeat steps 2 & 3 one more time and use a
sponge to pat the product in. That’s why there’s so much orange on my under eye
in the next picture.
Step 6: You
have now color-corrected your under eye area. It is not necessary for it to
look as orange as mine does, but I like putting a bit of excess product just in
case some of it gets away in the later stages.
Step 7: time to get those fingers dirty! Take
some of the concealer on to the tip of your ring finger. The shade I’m using is
DFD.
Step 8: gently PAT it onto your under eye area.
DON’T blend it out yet. It is important
to know the difference between patting, swiping and lightly swiping. If you
swipe (even lightly) you will move the layer of color-corrector underneath
& undo all the efforts you made to color correct that area.
Step 9: take some of your concealer onto a
synthetic eye brush.
click to zoom!
Step 10: gently apply it to the area just below
the lash line. Because my finger is too fat to do a precise job here, I opted
for the brush.
Step 11: gently blend the concealer using
patting motion
Step 12:
switch to a sponge(optional) for a sponge more seamless effect. Go over steps 7-12
till you get enough coverage & you’re able to conceal the corrector
Step 13: that’s how my under eye area looks when
I’ve built up the product sufficiently. You can see the difference between Pic
11 & Pic 1 to understand how useful color correcting is.
Now if
you don’t care about highlighting, you can skip the next steps & just set your under eye with powder.
But if you’re interested, here’s what you need to do next.
Step 14: I decided to go for a yellow toned
highlighter, I took a bit of the yellow concealer onto my synthetic eye brush.
Step 15: a lot of us Asians have that arc-like
line that makes our eye socket look sunken. I decided to apply the highlight shade
to that area, in order to bring it forward. If you want, you can apply the
highlight in a upside down V/U shape. I used a brush to be precise here.
Step 16: using a sponge, gently pat the
highlight so that it gets blended into your skin. Remember to pat & not
swipe ! Repeat steps 16-17 till you are satisfied, but don’t go overboard with
highlight either.
Step 17: this is how my under eyes look now, the
arc-like line has not receded fully, so I’m going to take the help of a
brightening powder now
Step 18: I love applying powder using the Beauty
Blender sponge, especially to the under eye area because it gives a seamless
look & diminishes the appearance of lines. If you want to try this out,
take some powder onto your sponge.
Step 19: pat
the powder onto your under eye area, make sure to get the tear duct area too.
Step 20: You’re finally done ! See the
difference between Pic 1 & the last picture. Do you like it ?
That’s it for today’s post ! Hope it was
helpful, so far this is the longest post I’ve done! I know it seems sooo long, like 20 steps long, but once you get the hang of it, you can do it in 10 min, like I am able to! Besides, the steps in which you have to just get product onto your finger/brush don't count, right ?
Let
me know if you have tried color correcting & how it worked out for you?


